Tuesday, April 30, 2013

1 day left....are you tired of waiting?

Let's do something just for Fun....Dream Pop goes live on my website at Midnight tonight! The VERY FIRST FIVE Orders that qualify for the May Stamp of the Month ($50 or more) submitted on my website will win one of my 5 new Dream Pop Pre-cut Layout kits absolutely FREE! No shipping fees, No tax, and I won't bug ya after you receive it! :)


On my CTMH Shopping Website you will find the Gathering named MAY DREAM POP ORDERS ending May 15th.  Click JOIN, Place your qualifying order, and if you are one of the First FIVE I will contact you tomorrow and get your DREAM POP Layout kit on it's way, right into your hands!  

Easy Cheesy! Let's do it! Get out your idea book or browse here  and be one of the First Five to submit, the Kit is as good as IN YOUR HANDS! :) 

Blessings, Sus

Ruffled Ribbon Tutorial

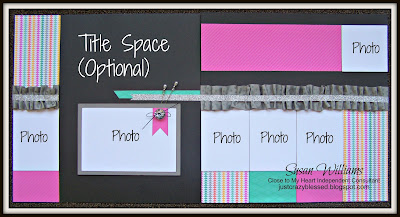
Yesterday I shared this Layout with you, I also promised to share with you a short tutorial on how easily I created the Ruffled Slate Satin Polka-Dot Ribbon on the left and right pages. 


I am a girl of my word so here goes....Now, first thing's first, please be gentle with  your critiquing, I am only a week old in the Blogging world and my photography skills are in need of some MAJOR intervention...did I also mention the photos were taken with my older-than-dirt mobile phone?! 

Hopefully, all things aside, you can see how fun and easy these ruffles are to create.

Each ruffle will  need it's own cardstock base.  For my layout I needed a 3"  section as well as a 12" section.  I cut both base pieces at 1" wide leaving me with cardstock pieces measuring 1" X 12" and 1" X 3".


Using a DRY adhesive (Tombow, ATG, Sticky strip/Red Tape, etc.) cover your base pieces entirely.


You will need to trim your ribbon to equal DOUBLE the length of your base pieces + 1".   This gives you 2" per every 1" of base length plus 1/2" on either end to "faux hem".  

My ribbon pieces for this layout measured 25" and 7" in length.

Using a bit of adhesive fold under each end leaving a "pretty" edge (faux hem).  


Next, begin sticking your ribbon onto your base, ruffling it as you go and making sure that you will have enough to stretch the length of the entire base.


Don't fret over it being "just right", you can't  mess it up. :)


Once your ruffle is adhered be sure to smooth over it using pressure to guarantee a good "hold".

Cut your shimmer trim pieces to equal the length of your base pieces + 2".  My shimmer trim pieces were 5" and 14" in length.


Peel off the adhesive backing and leaving 1" on each end of your base while using good pressure give the trim a firm "stick" on top of your ribbon ruffles. 

Flip your base over and adhere the ends of the trim to the backside.  This also helps hold the ruffles into place.  

Add adhesive to the back of your ruffled base and adhere it to your project.  Fluff and adjust the ruffles as desired.  :)


I do hope these instructions were helpful for making ruffles with your ribbon....I have also used these steps with our Textiles and it works so perfectly!

Please leave me a comment if you'd like, I'd love to know if this was helpful in any way.  

Thank you for hanging with me while I get my feet wet with all this techie stuff...I have lots  to learn, I'm so Blessed to have you along the way!

Blessings Dear Friends, Sus

Monday, April 29, 2013

They have made their way.....:)

You can now find 5 Dream Pop Pre-cut Layout kits in my Ebay Shop!

But why a Pre-cut kit? OF COURSE you will want the entire Dream Pop Paper kit to design your own projects but don't discount the ease and speed of a pre-cut kit! 

Many of my ladies especially love to tote my kits to crops and other events due to the little need for additional supplies.  I have done all of the hard work for you! I've designed (many times with help from other talented ladies), trimmed, cut from the cricut, measured, and even most times I've gone so far as to tie your bows ALL for you! Truly I've done the hard part! :)


Most kits do not require any additional tools other than various adhesives and scissors.  Plus, how great is it to entirely use up a purchase?! No odds and ends laying around to keep track of or left overs to store in your craft space! Just a Photo-ready Layout done in NO TIME! :)  

 I must admit, I do love sitting down and just relaxing in my "paper zone"...no thinking necessary! 

All of my kits come packaged in Close to My Heart's (reusable) Clear Zip Top bags and come with a color photo of the finished layout.  Occasionally I will include tricks, tips, or additional notes to help making assembly easier as well.  We live in a Pet free and Smoke free home so if you have allergies (like me) rest assured that will never be a factor. 

My inventory fluctuates as some kits aren't big sellers and some are wildly popular and I have trouble keeping them replenished. The most current inventories of  my kits can be found in my Ebay shop.  Not a fan of Ebay? No problem! Just Email me directly and we can get your order arranged!   

Here are 5 of my newest kits, all including the Dream Pop Paper :)


To make a purchase of these or any of the other Pre-cut kits you will find stocked in my Ebay Shop please just just holler at me, I'll be most happy to assist you and get your purchase on it's way to your craft space! :)

Blessings Friends, Sus

The SPARKLE side of Dream Pop!


Greetings Friends! 

As we talked about last week, the Emboss resist cardstock sheets included with the Close to My Heart Dream Pop promotion are just Crazy Obnoxiously Bright! Really, they just Sparkle! 

I really wanted to bring out the Shine in the kit so I went through my drawers and grabbed a few of my favorite Glitter embellishments.  


As seen here in the photo, by using a black cardstock base the bright colors seem even more Electric! They almost seem to "Pop" right off the page! I wanted to add something to really Jazz it up so I grabbed for my most loved Close to My Heart embellishment of all time, the Bling Assortment


One of my other favorites that I seem to grab with almost every project is the Silver Shimmer Trim! Did you know it's even adhesive backed? BIG SMILE! It also comes in black and I'd be lying if I said I was not crossing my fingers for even more colors of Shimmer trim with the debut of the 2013 Autumn/Winter Idea book this July!


My favorite element of the layout has got to be the ruffled ribbon! The Slate Satin Polka-Dot Ribbon is just perfect for ruffling! While it might look a bit complicated I can assure you it's easy as can be! If you'd be so kind, join me back here tomorrow for a short photo tutorial on how I created the ribbon ruffle! 

This Sparkly kit will also be in my Ebay shop very soon. I'll be happy to announce when it's made its way into the online inventory!

Until tomorrow, Thank you for visiting! It just makes my day!

Blessings, Sus 

Friday, April 26, 2013

Nothing OBNOXIOUS about this!

As promised I'd love to show you a few photos featuring the Emboss-resist Cardstock included in the New DREAM POP Paper kit available EXCLUSIVELY throughout the Month of May in celebration of National Scrapbooking Month! Was that a mouthfull or what!? :) 

I haven't been a part of the 'CTMH' Family for an overly long time but to the best of my knowledge they have never offered a product quite like this! 

Each Dream Pop Paper pack will include 12 sheets of this fabulous Cardstock - 2 each of 6 colors.  Grey, Mint, Strawberry, Raspberry, Tangerine, & Banana! I Love these specialty colors and I promise you will too! One side of your cardstock sheets will include the Clear Emboss-resist pattern, the other side will feature the same smooth cardstock you have loved and purchased from Close to my Heart for years. 


 How about a little better picture? You are MOST welcome. :) 


Check out those patterns! ECK! Can you be IN LOVE with Cardstock? :)  I might just be! I have been saying these papers are SO Bright and Shiny they are almost OBNOXIOUS! Okay, so I mean OBNOXIOUS in a Good Way of course! :) 

Aren't the cardstock sheets fantastic next to the CTMH Glitter Paper !? I hope you can tell how bright and cheerful these new products are! :) 


Here's another 'sneak peek' to share with you...I created this layout for a friend and I'd like to wait until she has the chance to share it on her blog before I do! SOOOO...More of this layout later. :) I do hope it gives you a great look at these fabulous papers and the patterns they offer.  I'm so excited to share even more projects with you over the coming weeks! 


Blessings, Sus

Thursday, April 25, 2013

Just a Quick Somethin' to Brighten your Day!

I am Thrilled to begin sharing some of my DREAM POP Artwork with you over the next several weeks! I do hope some of my projects can add a little sparkle to your day! :)


I've paired the Tangerine and Mint colored emboss-resist cardstock sheets, yes...that's what I said - Emboss Resist! More about those little treasurers tomorrow! Now back to your regularly scheduled programing.....I've paired the emboss-resist cardstock sheets as well as the Mint/Grey  Background & texture (B&T) paper with the Barn wood B&T pattern from the Dakota My Reflections Kit for a bit of a "rustic" feel... Okay, so it isn't Rustic but I do think it's DARN CUTE. :) Toss in some Burlap threads, wooden buttons and a few Square studs durables and....Done.!


If you didn't already know, one of my very favorite ways to market Close to My Heart products are through my Pre-cut/Pre-stamped Layout kits! I stumbled onto this about a year ago and it has continued to be very successful.  I am very much a "home body"...my husband often Jokes that if It were not for my 40 hour per week job and my Facebook habit that our friends wouldn't even believe I existed.  I love working in my studio listening to some Southern Gospel tunes and enjoying a glass of Iced tea.  Honestly I'm quite content being a hermit and enjoy nothing  more than hearing a customer tell me how much they enjoy my kits!  This kit will be coming soon for purchase. In the mean time feel free to take a peek at my current inventory,  I have a number of layout kits for purchase presently, all can be found on my Facebook pages or my Ebay Site.


Thank you for hanging with me for day #2 dear friends, It's gonna be a wild ride, I appreciate you joining me! :) 

Blessings, Sus

Wednesday, April 24, 2013

Close to My Heart is SUCH A TREAT!

One of my very favorite things to create with my Close to My Heart Products are what I like to call 'Treat Treasures'! Do you give hand crafted treasures to your loved ones? As a Christian Mom it is my desire to raise our son to be a servant to others.  At the age of 9 and having Autism it is sometimes a struggle for Cody to learn as well as his daddy and I to demonstrate.  I enjoy-more than anything-having him join me in my craft studio to create treat treasures for our family, Sunday school classes, or friends.  He enjoys getting messy with mom's things and I enjoy spending quiet time with him doing something that I love!  

An experience that we had last fall (and one that I enjoy re-telling) will remain in my heart forever...My husband and I, our son Cody, along with my Sister & Brother-in-law as well as their two children Koel and Riley created a project that we plan to make a yearly tradition for our families.  It was such a small gesture yet received BIG response...I am getting goosebumps thinking of that day all over again...I really have no idea where the idea came from and truth be told it was a pretty silly idea.  The response was very humbling for us all.  We baked all kinds of cookies, popped popcorn, and sorted candies into small plastic baggies and  added a special touch...


We filled our baskets and headed to our nearest Wal-mart, about 45  minutes away, on Thanksgiving day! We thought, "when better to show appreciation to others than during one of the most hurried, busiest, and Thankless days of the year?!"...Preparing for Black Friday! So, we and our kiddos headed inside and every employee we saw working that morning received a baggie, and more importantly a Smile and our appreciation.  I would have NEVER believed how it touched some of them.  Some accepted our small gift with a bit of a "dumb founded" look on their faces later to walk away, turn back around and shout "Hey, Thanks!!" and others light up right away in such a way that my heart skips a beat just thinking about it.  Most we left smiling, some wanted to take our kiddos' picture, and ALL were extremely thankful.  I think the Cashiers in the front of the store were most effected, I can assume they had already had a rough day of disrespectful customers thus were the most appreciative and shocked.  We heard the most delightful things from them, "Your children are precious little servants", "This is the sweetest thing I've ever heard of", and one young lady was especially effected as she went to hug me I saw tears streaming down her face and she said "No one has ever shown me love as your family has today".  It was such a humbling experience for us, I remember the moment when I turned around to look at my husband and brother-in-law and noticing they had lumps in their throats and mist in their eyes thinking that I have NEVER experienced a "High" as I had at that very moment.  We passed out well over 100 baggies that morning, we gave one to EVERY single employee working that day, and I feel certain that even with our smallest of gifts we BLESSED over 100 people as well.  It was an incredible day for us! We are already planning on doing it again Thanksgiving 2013, this time Bigger and Blessing even more.  Have you ever seen a bunch of PROUDER kiddos? :)  


I would LOVE to see some of your 'Treat Treasures'! better than that I'd love to hear a story of how you have Blessed others!....post a link for me please (I'm new at the Blogging-obviously-so I'm sure there is a better way to share our photos & information but I'd love to see and hear them!)  

I am so Thankful that Close to My Heart makes creating our 'Treat Treasures' Faster, Simpler, Easier! 


Blessings, Friends! :)

Tuesday, April 23, 2013

DREAM POP!?

Frequently I am...how do they say it? "Late to the Party"...so I'm just gonna hit the ground running with this campaign! 

Close to My Heart Celebrates National Scrapbooking Month each May by offering a SPECTACULAR Campaign and they out-do themselves each and every year!

April 1st they unveiled to us DREAM POP...my word it was WORTH THE WAIT! 


While this photo does not do the kit justice it does share the bright and vibrant colors it has to offer! This Campaign is Exclusively available May 1st - May 31st for only $10 with any $35 order of Close to My Heart Products (While Supplies last clearance items are not included for this promotion) The Best part.....There is NO Limit to how many times you can take advantage of this promotion throughout the month of May! 

Check back in the coming days, I'll be sharing lots of artwork created with the Close to My Heart DREAM POP Campaign. 

Well, It looks like I've survived my first OFFICIAL Blog post....was it painful for you? :)

Blessings, Friends!
TESTING!....3...2...1...Entering Blog Land! Gonna be a Crazy Ride, Wanna join me? :)